
How to Clad a Shipping Container - A Complete Guide
6 comments
Updated: March 18, 2024
Adding cladding to a shipping container has many benefits including providing insulation, soundproofing and of course making them more aesthetically pleasing.
In this two-part guide, we will firstly address any questions you may have about the materials, the tools you need, the cladding process and its benefits.
In the second part, we will show you a universal step-by-step process that helps you plan your shipping container cladding project.
Additionally, we have a video tutorial and a downloadable PDF for you, with detailed instructions for cladding in plywood, all without screwing or drilling into your container - so that your container remains undamaged.
Table of Contents:
PART 1: All About Shipping Container Cladding
What is shipping container cladding?
Can I clad a shipping container with wood?
What materials can I use to clad?
Why add cladding to a shipping container?
Benefits of cladding the outside of a container
Is cladding better than painting?
How much does it cost to clad a shipping container?
PART 2: How to Clad a Shipping Container
Step 1 - Plan ahead
Step 2 - Choose your cladding material
Step 3 - Choose your frame material
Step 4 - Place your container into its final position
Step 5 - Create strong fixing points at the corners of your container
Step 6 - Build your shipping container frames
Step 7 - Add studs and noggins to the frame
Step 8 - Attach your cladding material to the frame
RESOURCES:
▶ How to Clad with Timber
[PDF]
▶ How to Clad with Timber
[VIDEO]
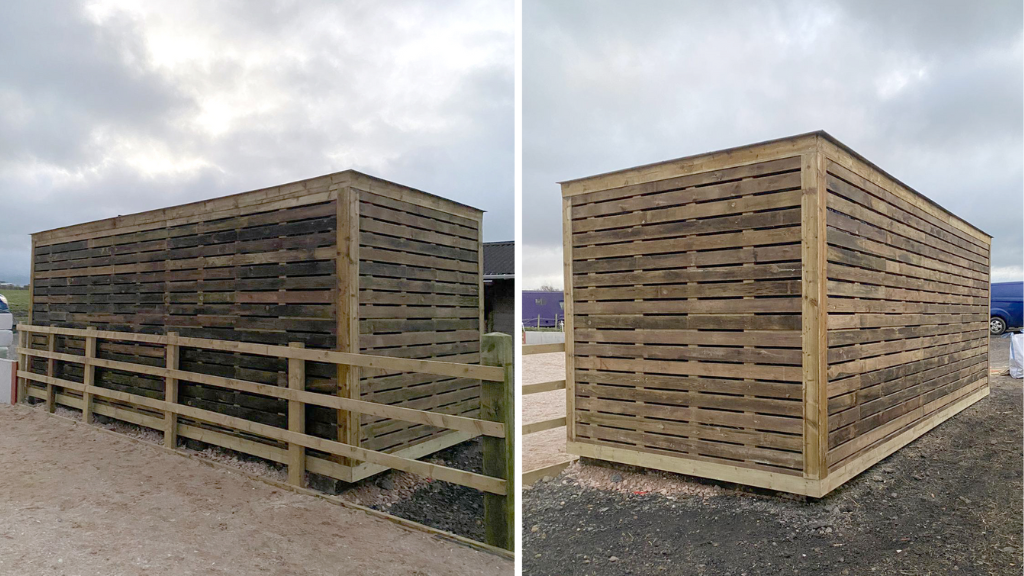
▶ Cladding Case Study
PART 1: All about shipping container cladding
What is shipping container cladding?
‘Cladding’ means the same as ‘clothing’. So when we talk about cladding a shipping container, we are literally wrapping it in an exterior layer of material.
Shipping container cladding is any kind of layer added to the outside of the shipping container to protect it and to improve its appearance. Typically, the most popular cladding materials are steel, timber, or other types of wood.
Can I clad a shipping container with wood?
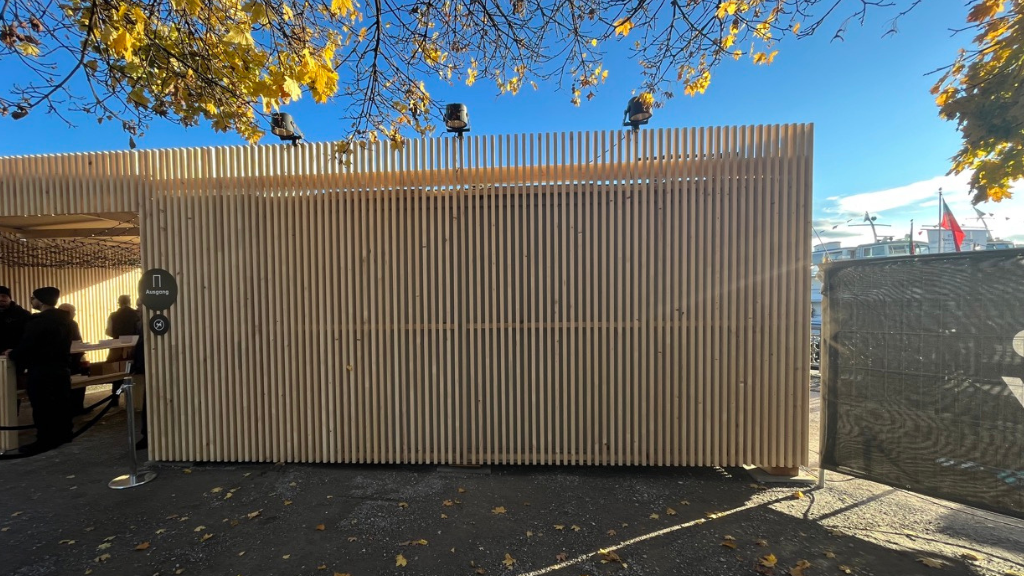
A shipping container can be clad in just about anything, but wood panelling or strips are certainly among the most common materials. Since wood is an abundant and renewable resource, easily worked with and made to look attractive, it lends itself particularly well to being a material to clad a container with.
It is possible to use timber-based sheet material, wooden tongue and groove panelling, timber batten and even strips of tree bark to clad the outside of a container.
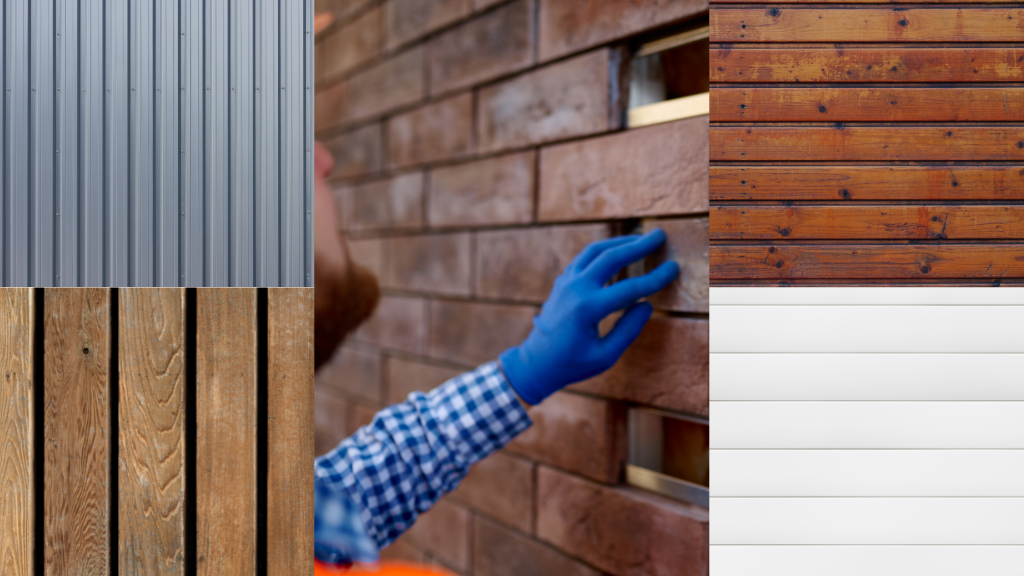
What materials can I use to clad?
As we mentioned, the most popular materials for cladding are steel, timber and other types of wood, but to give you an idea what you could clad your container with, here are some of the options you have. Some possible cladding materials are:
- Metal
- Brushed steel or aluminium
- Other steel panelling
- Timber
- Plywood
- MDF
- Tongue and groove cladding
- Tree bark
- Timber batten
- Composite materials
- PVC sheeting
- Foam board (such as foamex)
- Vinyl
- Both printed or coloured
- Brick slips
Make sure to check your local building regulations before starting a shipping container renovation project. Some countries or regions regulate the selection of suitable cladding materials for containers and their use as living spaces.
Check with your local authorities if there are any regulations or permit needs concerning the use and conversion of your shipping container.
Why add cladding to a shipping container?
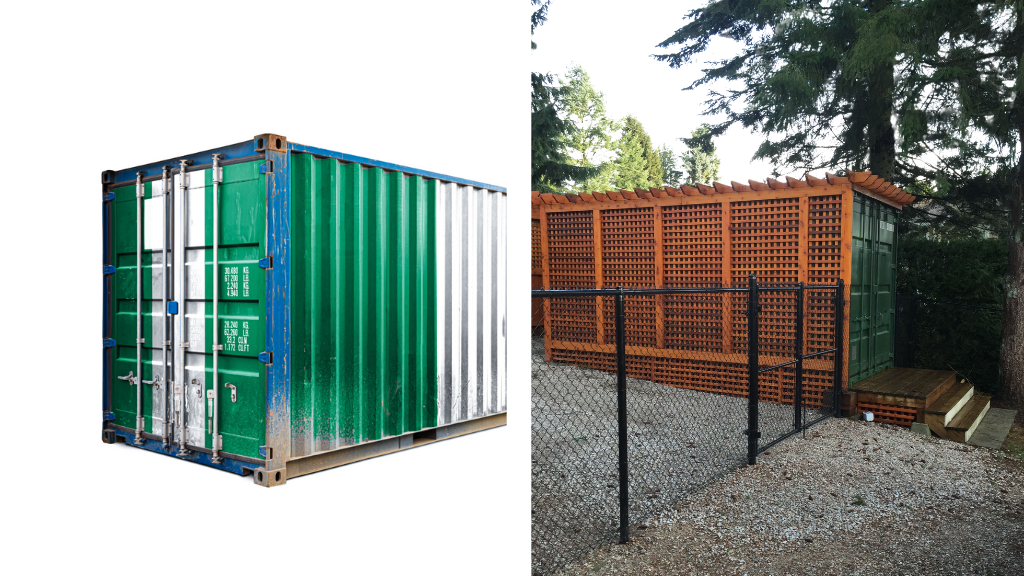
Although some people might appreciate the industrial aesthetic of a shipping container, it is not an appropriate look for all situations and environments, particularly in rural settings and when the container is being used for a purpose far removed from its original role for transporting cargo.
The sides and roofs of shipping containers are made from corrugated steel. While they are perfectly suited to their life at sea and as part of their structural integrity, they have a number of drawbacks when being reused.
With a large surface area they get very cold in the winter and hot in the summer. They create very unusual and sometimes unpleasant acoustics both inside and nearby them, making them unsuitable quiet work spaces inside and at events.
But perhaps most simply and importantly, they are not to everyone's taste cosmetically; at worst they will be patched in rust and flaking paint, and at best painted in drab industrial colours perhaps with the logo of a shipping container company on one side.
For any or all of these reasons, you might want to consider cladding your container.
Benefits of cladding the outside of a container:
-
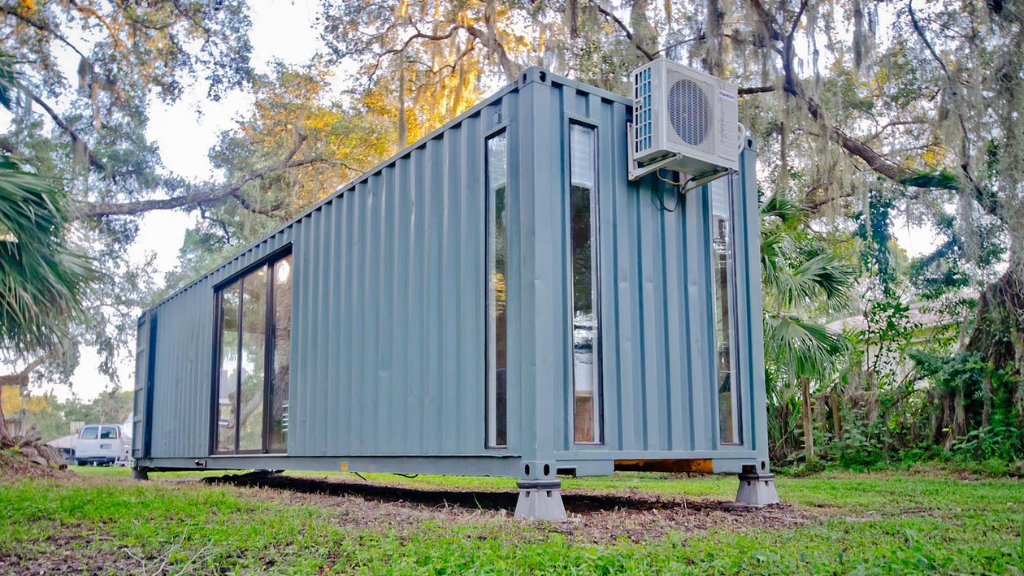
Improved appearance: By covering the container with a material of your choice you can change its appearance; make it look more natural, more professional, more cosy, more polished - whatever you prefer. You can create the look that suits the container’s new purpose and environment.
-
Branding: Signage can be added to the sides to make use of its surface for branding, information, or marketing.
-
Advantages Over Painting: Cladding offers several advantages over painting, which we discuss in this article, just below this list.
-
Weather Resistance: Cladding makes the container more resilient to harsh weather conditions.
-
Insulation: Cladding helps insulate the walls, and can be used to cover up exterior insulation. This saves you space on the inside of the container and insulates at the same time.
- Customisable: Cladding is very versatile and can be adapted and customised in many ways. It can even be taken off again.
-
Planning permission: In some cases, cladding the container may improve its appearance enough that it does not provoke complaints or planning consent issues.
-
Noise Reduction: Last but not least, exterior cladding can help reduce the noise levels inside the container and the acoustics outside, especially in noisy environments.
Is cladding better than painting?
Cladding and painting a shipping container should be considered as two quite different things, each with their own merits and drawbacks.
Painting might be a quick fix to make your container look a little smarter but you will have to select your paint carefully, and it is still a long process to clean and prepare the container thoroughly prior to the painting itself.
Don’t forget the four walls and the roof have over 50m2 of surface area to cover with paint. And it may need two coats of paint to get an even coverage over the (usually dark) colour that was there previously.
How much does it cost to clad a shipping container?
The costs of shipping container cladding will vary based on several factors:
-
The type of cladding material used, with material costs ranging from inexpensive options like timber or plywood to higher-end materials like composite panels.
-
Costs will strongly depend on whether you choose to clad it yourself (using instructions or DIY methods), purchase a cladding kit, or hire someone else to do the cladding work. Hiring professionals results in higher labour costs but offers convenience, while DIY requires some time and effort but is the more cost-effective option.
- The size of the container. Projects ranging from 10ft to 40ft containers will naturally vary in costs.
PART 2: How to clad a shipping container
There are two main stages to cladding a container; the first is creating the frame (or “subframe”) for the shipping container and the second is applying the actual cladding.
In fact, the framing of the container will require the most consideration and work. The final cladding part, i.e. attaching the exterior material to the frame, will be comparatively easy.
Let’s look at a generalised view of the process so you can get an overview of what’s involved.
Shipping container cladding, Step-by Step
Step 1. Plan ahead
Ask yourself; Is cladding the only thing you will want to add to the container? Might you later decide that you want a roof, exterior lighting, or solar panels?
This might affect your decision for how you clad it and in which material. Once you have sealed in all the walls and corners with cladding, you may find that you're limited with fixing points to add other applications later.
What will happen to the container once you're finished with it? A weathertight container with attractive cladding may retain significant resale value if built well and in such a way that the cladding can be removed, transported and reattached by its new owner. Shortcuts and quick fixes may get the job done cheaply now, but might be a false economy in the long term.
Step 2. Choose your cladding material
Decide first on the cladding material you want based on the look you want your container to have and on the need you have (reason for cladding), and keep in mind that the cladding material you choose influences which frame you will need to build (in Step 3) and which fixing points you will need to create on the container (Step 5).
For instance, using large flat sheet material such as plywood will require fewer attachment points for the cladding than bamboo. Similarly, steel cladding which extends beyond the walls of the container may require a stronger frame than a more lightweight material which only covers the walls of the container.
Step 3. Choose your frame material
Whichever material you choose to cover your shipping container with is not going to attach to it directly; you will first need to build a frame on the sides of the shipping container.
Your frame will be a series of rectangular grids which you fix to the outside of the container and onto which you will fix your exterior cladding. Choose a frame material suitable for your cladding material and design. For most timber cladding, it makes sense to use a timber frame. For metallic or composite cladding you may prefer to use a Unistrut or steel box section frame.
Check our guide on how to frame a shipping container for more info.
Step 4. Place your container into its final position
Before you start: Ensure your container is well sited on a flat, solid surface. If it is not level, then framing and hanging the cladding will be more difficult. It may be necessary to place it on a concrete foundation. Now is also a sensible time to consider if you need to secure your container to the ground.
Step 5. Create strong fixing points at the corners of your container
You are going to start by choosing a way to attach the frame to the shipping container. For metal frames you can try to weld the main frame to the corner casting but this may be time-consuming, expensive, and damaging to the container.
Similarly, screwing into the container is an option but will require a substantial number of screws. However, this method will compromise the container's water tightness and make additional steps necessary to ensure proper sealing.
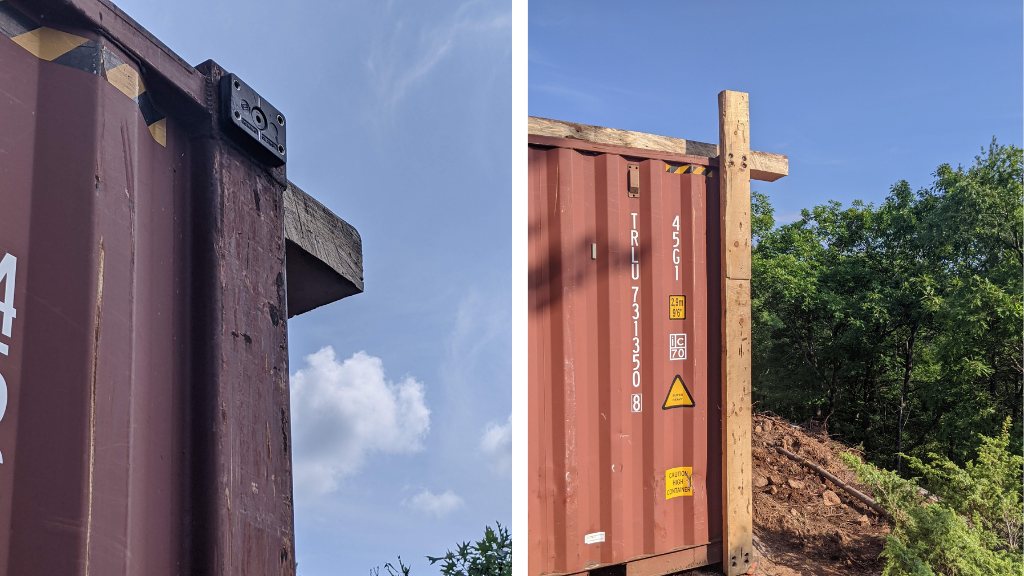
Consider using specialised clamps, such as Domino Clamps, as they have several advantages including guaranteed strength, ease of use, longevity, and ease of disassembly, all while ensuring your container remains in prime working condition.
At least one Domino Clamp in each of the four top corners of your shipping container will give you easy to use, solid fixing points for the corners of your frame, which won't damage your container. A further two or four (depending on your cladding design and weight) may be advisable on the lower corner castings.
Step 6. Build your shipping container frames
As previously stated, building the frame for the cladding is the key part of this process, and probably the most important to get right. Your goal is to create strong rectangular frames around all the surfaces you hope to cover.
You can do this by adding each part of the frame individually to the container. Or by prefabricating the frame nearby on the floor, then lifting it into position and attaching it to the fixing points.
You will likely need more fixing points than just a Domino Clamp in each of the four corners to prevent your frame bowing or sagging in the middle, or being able to flex away from or into the container. Our roof brackets attach to the top side rail of the shipping container, to provide extra support for the frame, exactly where you need it. We recommend a minimum of two roof brackets per 6m (20’ span).
Step 7. Add studs and noggins to the frame
Within the outside rectangular frame, you will need additional fixing points for the edges of all your bits of cladding so that the edges don’t hang loose. Studs are additional strips of vertical material, while noggins join them horizontally. Larger cladding panels will need equally spaced vertical and horizontal supports relatively far apart, while cladding which comes in smaller sizes may need them placed at closer, more regular intervals.

Step 8. Attach your cladding material to the frame
Now for the easy bit! Screw or nail your timber cladding to the timber frame, or screw, bolt or weld the steel cladding to the box section or Unistrut frame. Work carefully and neatly paying careful consideration to where two adjacent walls meet.
How do I clad the doors of the container?
The easiest answer to this question is “don’t”, but that doesn’t mean you can't make them look better.
Cladding the doors presents practical and mechanical problems, because either you attach your cladding directly to the door itself, which will obstruct the door opening handles and cause damage to the door itself if you screw into it, or you will need to create a mechanism whereby two sets of doors can open over each other despite opening from different hinges.
The easiest way is at Step 6 in the list above to frame off the container a good way past the door of the container, making the long walls even longer, and creating an area in front of the container large enough for the double doors of the container to swing open. Now you can add a second set of outside doors suitable for your needs.
Alternatively position your container in such a way that the door side is rarely seen, and don't worry about cladding the door at all.
How do I clad the roof of the container?
The process for cladding the roof, if you choose to clad it, is not really any different from the walls. Think carefully about your cladding material here, as non-porous large sheet materials will pool water, so consider raising one wall higher than the other so that water can drain off to one side.
You may prefer to build a more substantial roof for your container which you can do by using Domino Clamps and angle brackets over the roof of your container at Step 5, and using these as the basis for both your cladding frame and roof truss.
How do I attach the frame to the middle of the long side of the container?
In a lot of cases, once the cladding is attached to the frame, this will provide enough structural integrity to prevent the walls on the long side from sagging too much or coming away from the container. However, you can also use the following methods to secure the frame and cladding in the middle of the long side of your container.
- Our shipping container roof bracket supports long lengths of timbers exactly for this purpose. This is especially useful when working on a 40’ container or when attaching heavier structures.
One or more of these roof brackets along each side of the container will keep long timbers held secure to the top side rail of the container. Just make sure to select the appropriate length bolt from the dropdown menu when ordering the roof bracket, based on the size of the timber you are using. - Support the frame from sagging in the middle by supporting it from the ground underneath. An additional vertical brace of your framing material will do this quickly and easily. The disadvantage of this method is that with timber touching the ground, water seep up and into your timbers and cladding, causing them to rot over time.
- Screw the horizontal sections into the 30x30mm box section along the top of the long side of the container (this is not advised as it will damage the container and may create longer term structural problems)
- Secure the two long sides of your container together with one or two horizontal braces, in the same material as your frame, over the top of your container, and underneath the container, through the forklift holes at the base of the container.
Further Reads & Links:
Buy the roof bracket here in our webshop
Check out our YouTube channel to see all our brackets in action and learn how to use them.
Check our blog article introducing the different shipping container brackets to learn about their uses and find the right one for your project.
Download the Full Guide on
"How to Clad a Shipping Container with Timber"
[Free PDF]
How to Clad a Container with Timber [VIDEO]
The following video contains a method of cladding three sides of a shipping container with timber, using Domino Clamps, which will leave your shipping container completely undamaged.
These instructions are meant for guidance only and depending on the condition of your container and personal preference may need to be adapted to suit your needs.
If you still have questions related to the process, just contact us for more information.
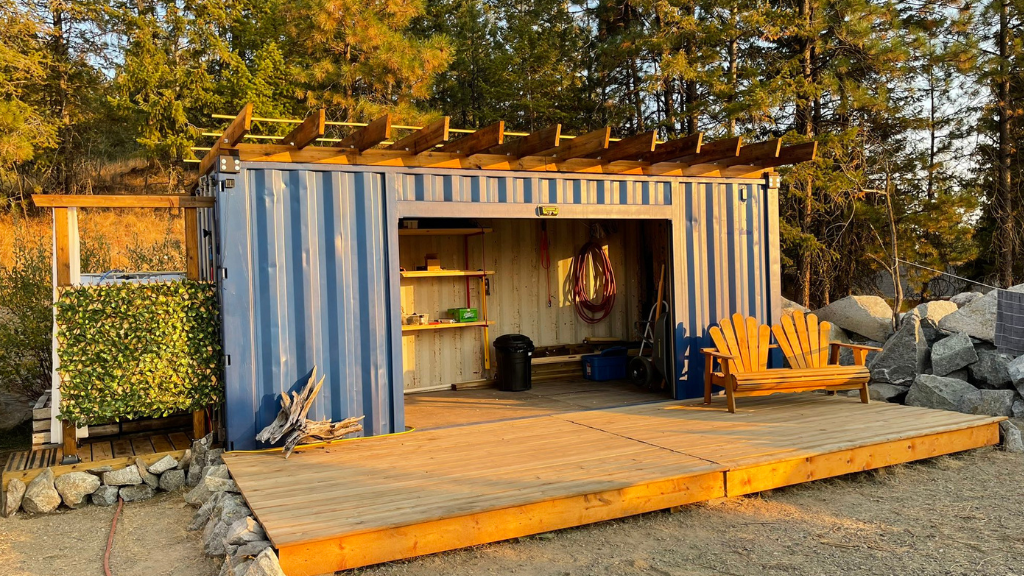
Shipping Container Cladding - Case study
See how Mike transformed his Shipping container into a timber clad bar using Domino Clamps in rural Northwest Arkansas so that it would look more in keeping with the woodland surrounding.

Sign up here to our newsletter and never miss out on any How-To-Guides for your containers ever again!


Comments (6)
Hi David – Spray foam insulation might be a good option. There is some information in this case study: https://dominoclamps.com/blogs/uses/how-to-build-a-shipping-container-office
Can you insulated for condensation an better heating for winter [ Ohio ] I build 2 × 4 walls in side use R 13 1/ 2 drywall getting condensation,took down a piece of dry wall an there were ice on the metal on inside got to fix this problem.
We updated this blog on 18th March 2024 to include information about cladding the container door and our new Midpoint container clamps [COMING SOON!] Email us to join the notification list hello@dominoclamps.com
Hi- I want to do this but also need a solution to clad the container door- do you have any suggestions/ solutions for cladding a container door which swings out?
Thank you
I have the exact same question. Even a 20ft side would be a struggle. 8 ft sides are a piece of cake. Be great to know the solution for the 40ft side. Especially if you want to stack them or bridge containers.
How would cladding be done for a 40’ container? It seems most lumber isn’t 40’ long and there aren’t spots in the middle of the container to attach a domino clamp .
Thanks, Nick