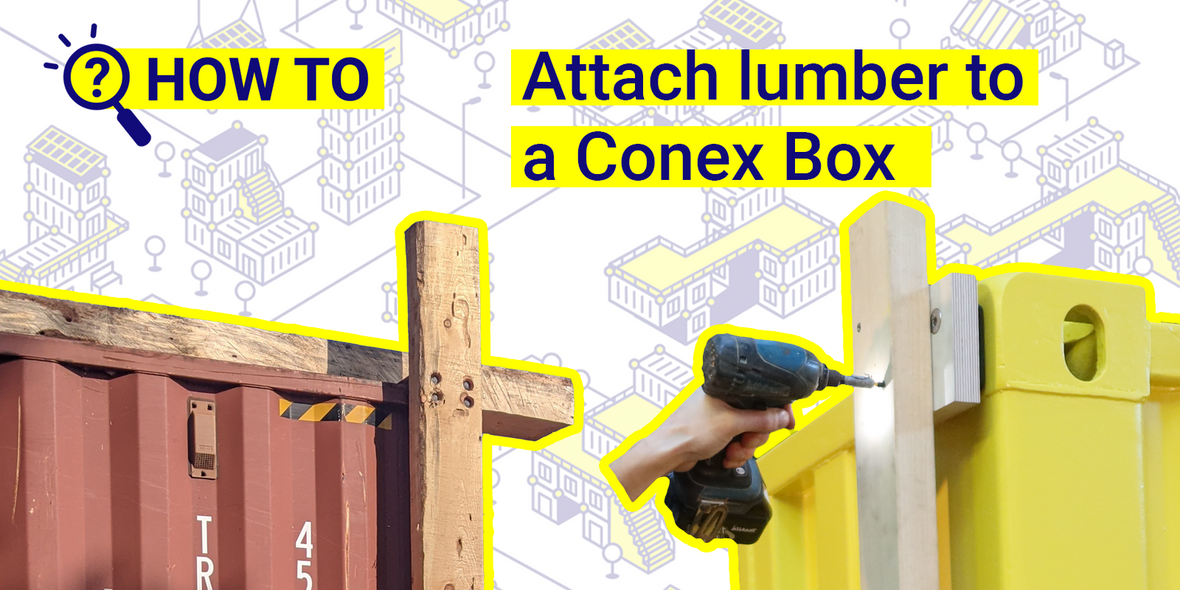
How to attach Lumber to a Conex Box
Attaching lumber or 2x4 studs to the exterior of a Conex box allows you to build a wide range of structures, from siding or insulation frames to roof platforms, lean-to structures, decks, posts, signage, and more.
There are several effective ways to attach lumber without drilling into the container, which means that its structural integrity as well as resale value stay intact.
In this article, we’ll cover:
-
3 sturdy methods for attaching lumber beams which don’t damage your container
(for lightweight to heavy-duty applications). -
How to attach lumber studs, joists, or lumber frames to the exterior of your container.
-
A way to provide extra support for long spans of lumber or heavy frames along the container’s side without the need for drilling.
All these methods ensure a strong, durable attachment and keep your container undamaged.


Three ways to attach lumber or studs to your Conex box
1. Attaching wood with plywood adapters and Domino Clamps
(for lightweight applications)

One easy way to attach lumber (as well as many other materials and objects) to the corners of your Conex box is by using plywood adapters and Domino Clamps. This method is ideal for lightweight projects like siding, signage, posts, shuttering ply, theatre flats, or small frames and decor. It’s quick and easy; just attach the plywood adapter and screw what you need to it using a power drill or impact driver.
The plywood adapter’s holes line up perfectly with those on the Domino Clamp and are countersunk so that the heads of the countersunk bolts sit out of the way and flush with the surface of the plywood. This adapter lets you attach pieces of lightweight lumber or wood with the advantage of providing a secure yet non-permanent connection.
For a full step-by-step guide on this method, check out our detailed instructions How to fix timber to a shipping container here.

2. Bolting lumber directly to the Domino Clamp
(for medium to heavy-duty applications)

For medium to heavy-duty applications, such as attaching lumber beams, roof trusses, or additional structures beside the container, bolting directly to the Domino Clamp is an effective long-term solution.
A few Domino Clamps securely fastened in the corner castings of the Conex box form sturdy mounting points for your ledger board, sill plate, or the first posts and beams needed for framing.
Drilling into a container’s box section edges damages the container, reducing its strength and potentially invalidating its CSC certification, so using Domino Clamps provides a reliable, non-invasive alternative. The corrugated sides of a container are too flimsy for attaching the wood directly, and cutting holes will reduce the container’s lifespan and allow water ingress.
To see the complete steps and tips for this method, visit our article How to bolt structural timber to a shipping container here.

3. Attaching lumber with angle brackets and Domino Clamps
(for medium and heavy-duty applications)

…with our steel Angle bracket
This method is suitable for large, heavy-duty structures like overhanging platforms or roof decks. Our steel angle brackets provide a strong shelf for supporting your lumber.
When the angle bracket is turned upside down, the top of the bracket is nearly flush with the roof of the Conex box. This setup lifts your lumber beam above the container height, which can be particularly useful when building a deck on top of the container.

…with our Steel Framing bracket.
This bracket isn’t as heavy-duty as the steel angle bracket, and might be used instead of bolting beams to the Domino Clamp. The main advantage to this method is speed and convenience. You can bolt the bracket to the Domino Clamp, position the beam where it needs to be, and then drill without worrying whether your drill holes are perfectly straight.

For detailed instructions on using the steel brackets, read our full tutorial here.
How to attach studs, joists or lumber frames to a Conex container
Lumber studs and joists play a crucial role in construction by providing stability and structure to walls, floors, and ceilings. By spacing studs or joists at regular intervals you can build a rigid framework that effectively supports exterior panelling, siding, flooring, or other large structural elements.
When working with a shipping container, attaching studs or joists directly to the metal walls isn’t ideal, because it’s difficult and may weaken the container’s structure. Instead, we recommend building a separate wooden frame that can be securely attached to the container using Domino Clamps. This method ensures that you get a strong, non-invasive support without drilling. You can then use this subframe to attach your studs and joists.
Your Subframe will attach to the corners of the container, using any of the methods mentioned so far in the article, according to your needs, particularly in regards to how heavy the structure is, how long you need it to be installed, and how quickly you want to install it.
For supporting your frame along the length of the container, we recommend using our shipping container roof brackets.
For a detailed guide on attaching a wooden frame (or even a Unistrut or scaffold frame) securely to your container, check out our complete guide on how to frame a Conex container here.
In the next section of this article we show you how you can add extra support if you are attaching heavy beams of lumber, or heavy frames.
Adding extra support for horizontal wooden beams along the side of the container
When attaching long horizontal lumber, joists, or the tops of your lumber frames along the length of your Conex box, the structure may require additional support to prevent it from sagging in the middle of the container.
Our shipping container roof bracket is designed to attach to the container's top side rail to provide extra stability for extended lumber structures. This is particularly useful when working with 40’ containers or heavier constructions.
By placing one or more of these roof brackets along each side of the container, you can securely hold long lumber or joists in place, ensuring they remain level and structurally sound. Choose the right bolt length for your roof bracket to match the size of your lumber beams.

Conclusion
In summary, the three methods we showed to attach lumber offer secure and efficient solutions for different weights and projects:
- For short term and lightweight projects, the plywood adapter and Domino Clamp method works best.
- For medium-duty to heavy-duty applications, bolting directly to the Domino Clamp is a durable and tidy solution
- Alternatively, other medium-duty to heavy-duty applications might use our steel angle brackets for quicker on site construction, and allow you to position your lumber along top of the container.
If you are looking to attach studs to the exterior of your container, we recommend to avoid drilling into the relatively fragile walls, and instead work with a frame, which you attach to the container without damaging it.
To give heavy pieces of lumber or frames extra support along the length of the container, or to give extra support to a wooden frame, we have especially developed the roof bracket.
More tips & guides for your project:
For more step-by-step instructions, you can also check out our full guide on different ways to attach wood to a container.
If you're exploring container modifications, take a look at our roof brackets, framing brackets, and other shipping container brackets, designed for many types of projects.
Planning to add siding to your container? Our detailed guide on shipping container siding / cladding covers everything you need to know.