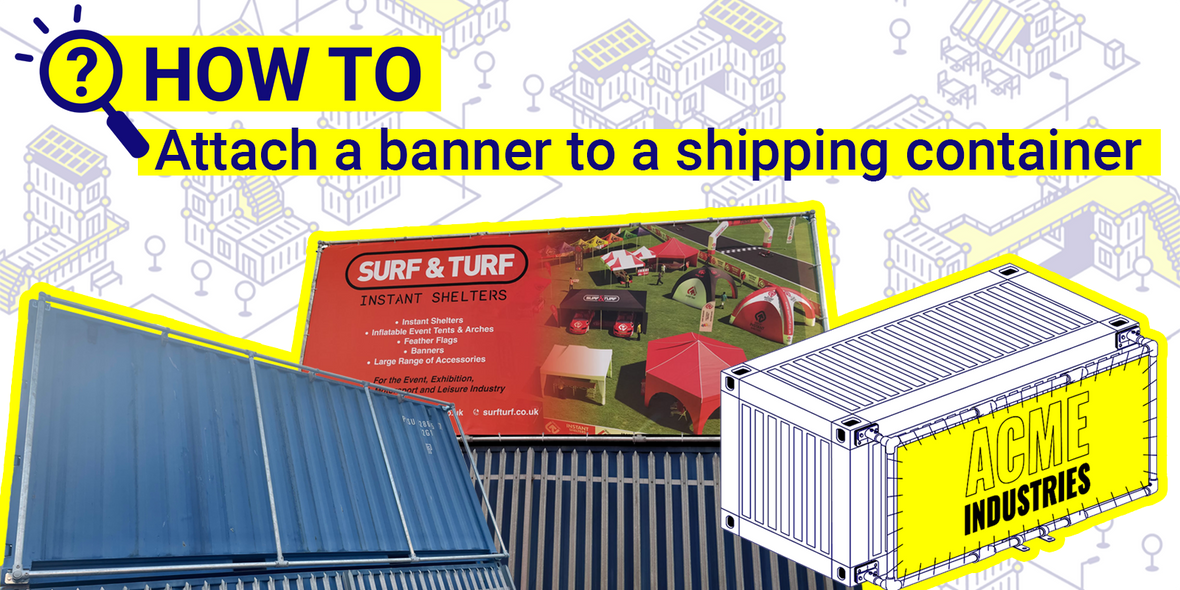
How to attach a banner to a shipping container
4 comments
The large, corrugated rectangular sides of your shipping containers are usually considered to not be the most attractive of sights, which is why so many people choose to cover them in cladding instead.
Another option to turn these large unsightly areas to your advantage is to make use of them to hold up an advertising banner. Using the four corners of the shipping container as fixing points for a massive scaffolding frame, we have already helped some of our clients to do this, such as Adal Advertising. You can read our case study - Attaching a banner to a shipping container solar battery here.
Now due to customer demand we are pleased to introduce a range of three kits for mounting a banner frame to your shipping container. Whether you're looking to draw attention to your business using the containers in your yard or get your signage above that of your competition for your containerised food stall, you’ll find all the information you need about how to use your container as the support for the banner right here.

What methods can I use to attach a banner to my shipping container?
We have three main methods of attaching a banner to your shipping container, each one has the possibility to be modified to suit your specific needs, and depending on the requirements of your project.

20’ Banner kit - This creates a 20’x 8’ banner frame with two vertical supports in the middle allowing you to attach your banner along the entire long side of your 20’ shipping container. This can also be adapted to suit a 16’ container, or even a 40’ container.
20’ Raised banner kit - This creates a frame for the same size banner as the 20’ banner kit, but raises it up above the container for additional visibility. This kit allows you to set the top of the banner at whatever height you wish, and change the overall shape of the banner by lowering the bottom horizontal bar. This means your banner can be as tall as you like, and as high as you like, up to a maximum of 6m.
8’ Banner kit - This creates a banner frame on the short end of your shipping container for an 8x8 banner. It can also install a banner on the side of an 8’ or be adapted to put one on the side of a 10’ container.
For each of these designs, we offer a kit including all the Domino Clamps and tube clamps you need for the assembly. All you’ll need to source is the 48mm steel scaffold tube and the banner which you can do locally to wherever you are in the world.
Do you also provide the banner?
We don’t provide the banner itself, as we believe that it is best done by a professional signage company who can advise on your artwork, materials and printing options. Let them know the dimensions of the frame, and they will be able to do the rest.
How do I put the Kits together?
Below are the instructions for the 8’x8’ banner. These instructions, in addition to those for the other two banner designs, are available as PDF downloads.
8’ Banner instructions (pdf)
20’ Banner instructions (pdf)
Raised 20’ Banner instructions (pdf)
Instructions
- Start by installing a Domino Clamp in each of the four corner castings on the short edge of your shipping container. either the shield or Stadium shaped holes in one of the corner castings at the top of your container following our detailed installation instructions if you're unfamiliar with the technique.
- Use two M12x30 set screws and washers to attach a horizontal perpendicular tube clamp to each of the Domino Clamps. Use the top row of holes in the bottom Domino Clamps and the bottom row of holes in the top domino clamps for this. This will keep your banner frame closer to being square and will ensure that the cut list above is accurate.
- At ground level, put the frame together using four lengths of Scaffolding tube and the 3-way tube clamps.
- Insert a short offcut of the tube into each of the right angle sections. You can cut these to the recommended length of 15cm, or a bit longer if you prefer your banner to stand further away from the container for any reason.
- Now, with someone else to help, tilt the frame up and feed the short spigots into the tube clamps attached to the Domino Clamps.
- Have someone hold the frame in position while you do up the grub screws on all the tube clamps with the 8mm hex key, making sure everything is nice and tight.
- Attach the banner to the frame.
The 8x8 Banner kit contains:
- (4x) Domino Clamps
- (4x) Horizontal perpendicular tube clamps
- (4x) 3-way elbow tube clamps
- (8x) M12x30 set screws and washers
Each kit also comes with a cut list for your Steel tube and assembly instructions in pdf format. Or you can download the PDF instructions for free from our Downloads page
For more ingenious container solutions, useful information and offers delivered direct to your inbox, sign up to our information email 📨 or subscribe to our YouTube channel 📺


Comments (4)
Hi Lydia
you didn’t leave us your email. Please email us on sales@dominoclamps.com
I have a 20 × 40 foot banner I would like to hang on a shipping container. Please reachout to discuss pricing.
Hi Adele, please view the banner kits here: products>signage or email us hello@dominoclamps.com if you need additional assistance.
Interested in the 8" and 20" Banner clamps